 Backgrounds are the bugaboo of many artists, especially those who work in colored pencil, it seems. Just check out the colored pencil forum on wetcanvas! People spend hours on their subject and then worry about what to put behind it...and worry they will ruin it! The trouble with working subject, then background is that the background colors and values affect the colors and values of the subject. The background should support the subject, not the other way around. And, waiting til last to do the background makes for uninspired ones.
 I consider the background to be all the supporting parts of the piece, the foreground, the area immediately to the right, middle and left of the subject, and everything behind it. In this case, both the chair and the wall behind are, to me, the background. They support the main focal point, the cat.
Now I know why people leave the background til last, especially in a time-consuming medium like colored pencil. Because when I was starting out, I did the same thing. You are worried that you'll spend hours on the background, only to fail at producing a nice looking subject! Well, if you use a hard paper like Mi Tientes and have your white eraser handy, you have many bites at the subject "apple"!
Some tips on how to erase colored pencil: Just keep going. The wax pigment will first smear, keep going. It will ball up and you can brush it off. For tight spots, go the the drawing department of the art store and get an eraser encased in wood that you sharpen. Mine has a pink eraser.
Not all papers are erasable. I put a hole in stonehenge, it's a soft, printing paper and that's one of the reasons I don't like soft paper for colored pencil.
Now, at this stage you can see, I've added more layers to the background. I want it to be dark, yet warm, so I've layered a dark red (Prismacolor's Black Cherry), along with browns. What is not quite so visible is that while I've been adding pigment, I've been carefully refining my initial drawing. What really helps is to look at the negative space shapes. For instance, rather than looking at the leg of the chair to see if it's right, I look at the space behind it that is created by the leg, the crossbeam and the seat of the chair. I already drew it by looking at the leg, so this is a great way to kind of double check.
I use the side of the pencil lead, a flattened "point" of the lead and sharp points for the next step:
Another important part of the background is making sure it bumps up perfectly against the subject, which means sharp tight angles filled in, no paper showing gaps.
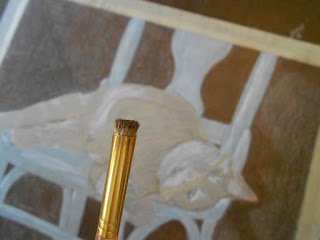
Added white to the light portions of the chair, then another layer of light blue and one of a celedon green. Darks will come later. And I've blocked in more of the kitty. Again, making sure my chair color bumps right up to the kitty.
 |
| Blending Colored Pencil |
Now I have 4 or 5 layers of the dark, and am ready to blend it, giving it a solid appearance with no paper specks showing through. There are many ways to do this, with a zillion layers of colored pencil (too time consuming for me), with solvent (I don't trust it on paper, I think it will degrade it over time), with the colorless blender pencil (100% wax, so it increases chances of wax bloom, where the piece gets a waxy haze over time). I've tried them all but love this tricked out bristle stencil brush to push the pigment into the little valleys of the paper. I got a pack of these inexpensively at a craft store and trimmed them all to make them even stiffer. Then I just swirl in little circles with a fair amount of pressure. I have big ones, little ones, ones for light colors and dark colors. You need at least 4 layers of fairly good coverage to make this work. If it's not blending easily, just do another layer of color.
 |
| Cat Portrait Beginning Stage |
My plan ... but I'm flexible ... is to have the brown background suggest the inside of a barn or shed with a very subtle ray of light hitting the cat. I don't want to go overboard with the ray of light because I feel that almost becomes the subject. And since my objective here is to be a cat portrait, everything, including the light, needs to support kitty, not compete with him!
I hope this has been helpful! Next installment will be beginning work on the cat and maybe modeling the chair a bit. You can get alerts when it's ready by "Liking" my facebook art page ArtistRobinZebley . And the "finale" of this piece will be at the Bluestone Fine Art Gallery, 301 N. 3rd St. Philadelphia, PA 19106 on Saturday, April 21, 2012, where I'll be finishing this up. And this piece can be purchased through the gallery!
Any questions on how to "paint" in colored pencil? Just ask! Robin


1 comment:
thank you, I find these tips very interesting and useful. Looking forward to following the progress of this piece. Eileen
Post a Comment